-
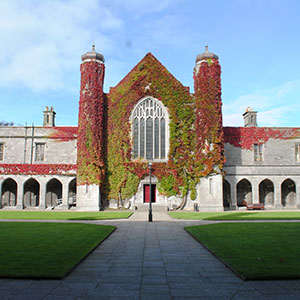
Courses

Courses
Choosing a course is one of the most important decisions you'll ever make! View our courses and see what our students and lecturers have to say about the courses you are interested in at the links below.
-
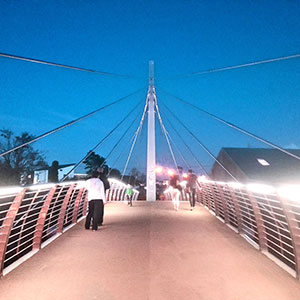
University Life
University Life
Each year more than 4,000 choose University of Galway as their University of choice. Find out what life at University of Galway is all about here.
-
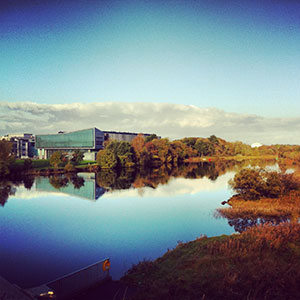
About University of Galway
About University of Galway
Since 1845, University of Galway has been sharing the highest quality teaching and research with Ireland and the world. Find out what makes our University so special – from our distinguished history to the latest news and campus developments.
-
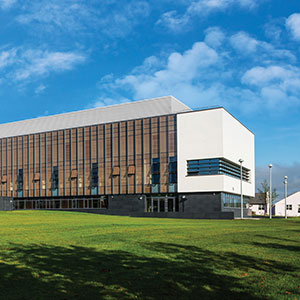
Colleges & Schools
Colleges & Schools
University of Galway has earned international recognition as a research-led university with a commitment to top quality teaching across a range of key areas of expertise.
-
Research & Innovation

Research & Innovation
University of Galway’s vibrant research community take on some of the most pressing challenges of our times.
-
Business & Industry
Guiding Breakthrough Research at University of Galway
We explore and facilitate commercial opportunities for the research community at University of Galway, as well as facilitating industry partnership.
-
Alumni & Friends

Alumni & Friends
There are 128,000 University of Galway alumni worldwide. Stay connected to your alumni community! Join our social networks and update your details online.
-
Community Engagement
Community Engagement
At University of Galway, we believe that the best learning takes place when you apply what you learn in a real world context. That's why many of our courses include work placements or community projects.


How to ...
Click on a topic, below, for instructions:
Add a page
- Click the Site Structure icon to go to the site structure

- Find the section under which you wish to add a page.
- Click on the section’s Actions button.

- Click on 'Create section'

- Insert the Name of your page (spaces are allowed).
- In ‘Output URI’, enter a unique directory name
(e.g. ‘about’ - this would make the CMS publish this page to https://www.uog.ie/yoursite/about/)
Note: No spaces are allowed - you can use hyphens ("-"), underscores ("_"), or tildes ("~") to separate words but we recommend using hyphens (e,g. 'about-us').
All other special characters (e.g. &$+/:;=?@#,. <>[]{}|\^%) are unsafe to use here. - If you don’t want a link to this page in your site's side navigation , then uncheck the ‘Show in Navigation’ in the Section options.
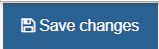
- Click 'Save changes' to save your changes and return to the site structure
- Click on the little white arrow and choose Save and edit section if you wish to remain in the newly created section.
This adds a new blank page into the CMS. The next step is to add content to that page. When this content is approved (by you), the page will publish to your site automatically.
Add content to a page
- Click on the site structure icon to go to the site structure.
- Find the section and page you wish to add content to.
- Click on the Actions button
- Choose '+ Create content'
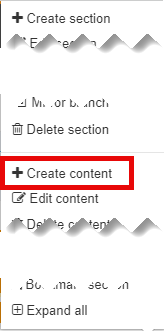
- The 'Choose content type' window will open
- Choose the content type you want to add to your page
- A new screen will open to the content type's content tab
- Fill in the fields required for that particular content type, all marked with a red asterisk are mandatory. (If you hover your mouse over a field help text will display.)
- Either:
(a) Click on 'Save Changes' to mark your content as not ready for publication. It's status will change to 'Pending' (i.e. pending approval for publication).
or
(b) Click on the small arrow beside the Save changes button and click on 'Save and Approve' to mark your content as approved for publication. Your change will go live within the next hour.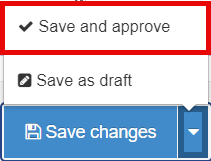
If you are already in the section you wish to add content to:
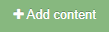
- Click on the Add Content button (right-hand side)
- The 'Choose content type' window will open as per above, follow steps from 6 above
Edit content on a page
- Click on the site structure icon to go to the site structure.
- Find the section for the page to edit.
- Click on the Actions button
- Click on 'Edit content'
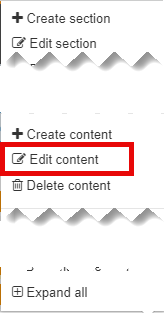
- The CMS will list every piece of content in that section.
Click on the Actions button for the piece of content you wish to edit - then choose 'Edit'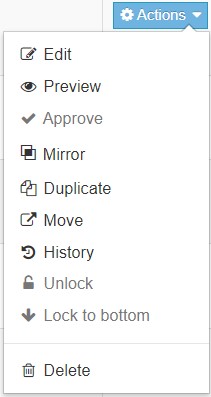
- Make your changes.
- Either:
(a) Click on 'Save changes' to save your content without marking it as ready to publish. It's status will be set to 'Pending' (i.e. pending approval to be published).
Or
(b) Click on the small arrow (beside the Save changes button) and choose 'Save and Approve' to approve your changes for publication. The CMS will publish your change within the next hour.
Add a Media Library Image to a Page
When choosing an image you need to fully comply with copyright law. Ensure that you have the right to use any images you upload or insert onto your webpage. Further information is available on our Images FAQ page - Where can I find Images to use on my website.
- Ensure the filename of your image does not contain any spaces, and don't use any characters that are reserved for web addresses in its filename ( ! * ' ( ) ; : @ & = + $ , / ? % # [ ] ) or you may not be able to load the image.
- Go to your web page and click on the content you wish to add an image to.
- Click on the WYSIWYG Editor's Insert Media icon:

- The Media Library will open.
- Find the image you wish to add to your page.
You can search for images - the search box is near the top of the media library window.
Alternatively, expand as many Categories as you need, by clicking on the small plus signs, and then click on the Media Library category (i.e. folder) that contains the image you wish to use.
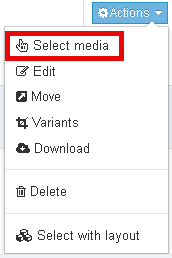
- Make sure the image you choose to add is a marked as 'Image (Foreground)'.
(Background images will not work in the WYSIWYG editor) - Click on your chosen image's 'Actions' Button and choose 'Select media', from the dropdown menu. This will insert that image into your page.
Add a New Image to a Page
Step 1: Prepare your image (~3 minutes)
You need to fully comply with copyright law. Ensure that you have the right to use any images you upload or insert onto your webpage. Further information is available on our Images FAQ page - Where can I find Images to use on my website.
First, know which content type you want to add it to.
Then size the image for that content type and make it web-ready by following these instructions: How to Create Web Ready Images
When saving your file ensure the filename does not contain any spaces, and don't use any characters that are reserved for web addresses in its filename ( ! * ' ( ) ; : @ & = + $ , / ? % # [ ] ) or you may not be able to load the image.
Step 2: Add the image to the CMS (~ 30secs - 2 minutes)
There are 2 ways you may be asked to do this:
Step 2a: (Scenario 1) Directly Attaching Images to Content:
Some content types want you to add a background image directly to the content.
In this case, you are attaching a web-optimised image directly from your computer hard disk.
When editing the content, you will see the option to 'Drop file here or click to choose' - you can either drag your image file onto the box or else click on the box to choose the image you wish to add.
Step 2b: (Scenario 2) Adding Images to the CMS's Media Library:
Other content types are configured to use an image from the Media Library.
When you edit these content types, you'll see a 'Select media' button
Also, wherever you use T4's WYSIWYG editor, it allows you to add foreground images from the Media Library. To do this, simply click on the Insert Media icon  (or else choose 'Insert' - 'Insert File Link or Image') whenever you want to add a foreground image alongside your text.
In both these cases, you will need to first upload your Image to Site Manager's Media Library. Once it's in the Media Library, it can be selected for use in your content.
Adding your web-ready image via the media library is a straightforward task:
Edit your content as usual. When you need to add an image:
- Click on the Insert Media icon or . Either will open the Media Library.
- Important: On the left hand side menu, expand 'Categorised' and any sub-categories until you find the category you wish to add your image to.
(Note: You can only add images to one of your group's categories. If you are a moderator, like the majority of CMS users, these will be marked with a blue and white cog menu)
Once you've found the category you want to upload the image to, click on its name. - Click on '+Add media' button (in the top right hand corner of the window)

- Add the Name of your image
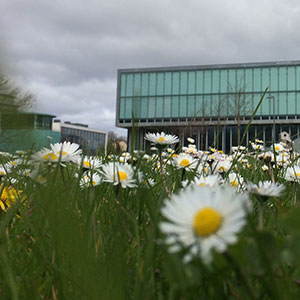
- Add a Description - this will aid anyone using assistive technology. Remember to describe what's actually in the image - not why the image is there: e.g.:
 Good description:
'A grassy park with lots of trees'.
Bad description:
'Walking under trees is good for stress relief'. - Set the media type to either ‘Image (foreground)’ or ‘Background Image / Image Path (CSS)’
Tip: 'Image (foreground)' is for when you want to include an image via the WYSIWYG editor. E.g. when using a 'Content', 'Content (no title)', or 'Course template 1' (or 2) content type. Most other content types require a 'Background image / Image Path (CSS)'. - Add some keywords to allow all users of the CMS to find this image when they use the Media Library's search feature.
- Click 'Save Changes' to upload your image to the Media Library.
- You're brought back to your media library category - you will see your newly added image there.
The image is now stored in the media library, ready to be used by any CMS user.
To use it yourself, click its name (or else use its actions button and choose 'Select Media').
The media library will close and you'll be brought back to the content that you were editing.
Step 3: Continue editing your content
Your image has now been uploaded to the CMS and selected for use on your content/page.
You can continue to edit your content as normal.
When you're finished, remember to click on the small arrow beside the Save changes button and choose 'Save and Approve', so that your edits will go live.
Delete Content From a Page
- Find the section you wish to edit.
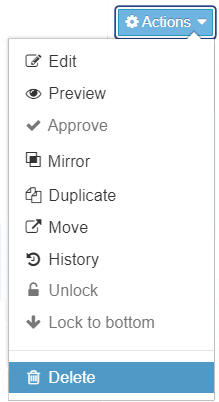
- Click on the Actions button and choose 'Edit section'.
- Click the content's 'Actions' button and choose 'Delete'
- This will mark that content as 'Inactive'. You will still see it in your section but 'Inactive' means it is also in the CMS's recycle bin, ready to be deleted permanently (by an administrator) at any time. When that happens, it will simply disappear from your section's content list.
Re-enabling the content
To un-do the deletion, re-edit the Inactive content and click 'Save changes', 'Save as draft', or 'Save and approve'. If you choose 'Save and approve' the content will publish to the live page again - for both other options it will be undeleted but will not publish to the live page.
Delete content from a page but keep it for later
When you delete content (or sections) they become Inactive; however this label is misleading - it actually means that it is in the recycle bin, ready to be deleted permanently at any time.
So if you want to keep some content for later, do not delete it - you should expire it instead.
Here's how:
- Go to the section containing the content you wish to remove from your page (but keep for again)
- Click on the Actions button for the content and choose Edit
- Click on the 'Options' tab

- Click on the 'Expiry Date' field. Today's date and time will be automatically inserted.
Note: If you click on the wrong field by accident, simply select its auto-inserted text and delete it. - Scroll down to the bottom of the page and click 'Save and Approve'.
The content will be marked as 'Approved / Expired' and will be removed from your live page, on the next hourly publish.
Re-enabling the content
If you ever wish to re-enable this content, simply Edit it. The expiry date will be automatically removed by t4. Then 'Save and approve'. The content will appear on your live page again on the next hourly publish.
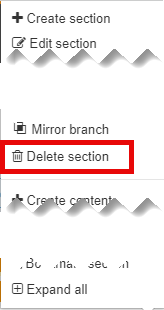
Delete a page
- Click on the site structure icon to go to the site structure.
- Find the section for the page to delete.
- Click on the 'Actions' button and choose 'Delete section'.
- This will mark the section as 'Inactive', adding it to the recycle bin, ready to be deleted permanently at any time. The section will listed in red text, in the site structure, to indicate this. The page this section publishes (and any links to it) will be removed from the live website.
To un-delete the page
You can un-do your actions, provided the section hasn't been permanently deleted by an administrator. If you can still see the section in the site structure, simply:
- Edit the inactive section
- Go to the 'General' tab
- Change the 'Status' field (2nd from the top) to 'Approved'
- Click 'Save Changes'
The page, and any links to it, will be re-published by the CMS (assuming some content, within this section, has a status of 'Approved').
Upload a Document to the Media Library
Warning: The filename of the document you are uploading must have no spaces in it. Documents with spaces will not appear on the live website as the space confuses the uploader. So rename your document first, using underscores or hyphens instead of spaces. E.g. my_file_to_upload.docx
- If you are editing content, click on the Insert Media icon to go to the media library.
- Otherwise, click on 'Content' in the left hand menu and choose 'Media Library'.
- You can only upload files after you have clicked on one of your own categories. So,
- Under 'Media Categories', click the plus symbol to show all categories.
- Then find your site's category.
Tip: For moderators (most users), the CMS displays a drop-down menu (with a cog symbol) beside any categories you have permissions to add files to. - Expand your site's category (by clicking its plus symbol)
- Click on its 'files' sub-category.
- Under 'Media Categories', click the plus symbol to show all categories.
- Click on the '+Add media' button (top right)
- Under Media details, you can either (a) drag and drop your file into the 'Media File' box or else (b) Click on the box, choose the file to upload, and then click 'Open'.
 Tip: Make sure the filename does not contain any spaces or it might not upload.
Also, remove any characters in the filename that are reserved for web addresses ( ! * ' ( ) ; : @ & = + $ , / ? % # [ ] ) or you may not be able to browse to the file once it's uploaded. - Fill out its name, description, choose the Media type, insert your keywords and click 'Save changes'.
Note: Any document you add to the media library won't actually be uploaded by t4 until you add a link to it in a published page (see how).
Link to an Uploaded Document
- Go to the site structure and find the section containing the content you want to place the link
- Edit the content.
- Place the cursor where you want the link to appear.
- Click on the Insert Media button
- Search your media library for the document to include.
- Click on the Actions Button and choose 'Select media' or click on the document’s name to insert the link
- The new link will appear on your page.
- The link name will be the Name given to the document in the Media Library.
- If you want to edit the name, double-click on the link and the 'Set media attributes' will pop up, where you can change the name of your link if required, i.e. Cartoon man
Link to Another Page
Many content types have a rich text editor with lots of editing icons in its top bar. This allows you to add text and images, and turn specific words/images into links.
If you want to add a link inside this editor, simply:
- Edit your content.
- Highlight the text or image you would like to turn into a link.
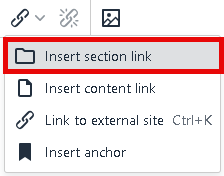
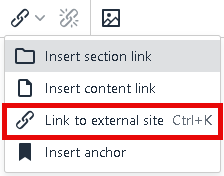
- To link to a page in Site Manager click on the Link icon

- Choose 'Insert section link' from the dropdown menu.
- Or Link to external site if that is the link you want to create
Some content types have a link feature built into them - in this case, they'll specifically ask you to select the section (page) in site manager you want to link to (internal), OR ELSE have a field for you to type in the web address to link to (external). Only fill in one of these and leave the other field blank.
Preview your page
From within your section, you can click the blue Preview button directly above your content.

While editing your content, you can click the Green Preview button above your content on the right-hand side, but this may not show complicated pages correctly.

The best way to preview a page is to:
- Go to the site structure
- Find the section in the site structure you want to preview
- Click on the Actions button and choose ‘Preview section’.
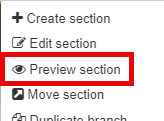
Note: Preview shows all content types, including Pending and Draft content, but only approved content will be included in published pages.
How can I keep my Site Structure Tidy?
If you have multiple sections or content which you no longer need and your site structure is looking cluttered.
- Create a section called 'TRASH' or 'DELETED'

- Under the General Tab set the section status to 'Pending'.
As per the image above, once set to pending the folder colour will be Orange and will not publish.
- Select the content you no longer want on your site and Select Delete from the dropdown menu.
- Once you have deleted a content item the status will be 'inactive', once set to inactive the folder colour will be Red.
- You can now move the deleted content into the newly created 'TRASH' or 'DELETED' section so that it is not cluttering up your view.
At intervals the system will be purged of any content within sections labelled 'TRASH' or 'DELETED' and your unwanted content will be permanently deleted.
Do not place items which you might want to use again in the future into the 'TRASH' or 'DELETED' sections. Content can not be retrieved once permanently deleted from the system.
Why is my content on Pending?
When you edit content you have three options when you save your changes.
- Click on the little white arrow beside 'Save change's and choose 'Save and approve' to Approve your content.
- Click on 'Save changes' to put your content on Pending.
- Click on 'Save as draft' to put your content on Draft.

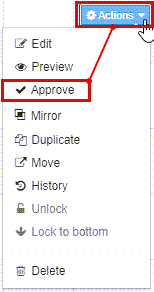
- If you click on Save changes in error and notice your content is on Pending use the Actions button to choose Approve.
Reorder my Content Items.
To reorder one item in your content
- Go to the Section with the content you want to reorder
- Go to the Content tab (should be automatic when you edit a section)
- Under the Order column, click on the cross hairs of the item you wish to reorder
- Drag the item, up or down, to where you want it to be positioned on your webpage.
- Click Save changes
To reorder automatically
- Click on the Enable Automatic Ordering toggle switch to put it on
- Choose the order option you want from the dropdown menu
Alphabetical, Last updated or Publish date - If you want to reorder all content items in your section, check if there is more than one page of items. If there are, click on the Display records dropdown menu and choose All, and then click on the select all checkbox at the top of the last column to the right.
- If you only what to automatically order an individual group of items tick the checkbox for each one manually
- Click on Bulk actions
- If you are reordering all the items click on Bulk unlock
- If only reordering a few items click on Bulk Lock top or Bulk Lock bottom depending on where you want the ordered list to appear on your page.
The items will reorder according to your settings.
Note: You do not need to Save changes when you are changing the order of your content. Once you reorder menu or content items, if you leave the section without saving or click Cancel the changes remain in place.
Reorder my section menu
To Reorder your section Menu:
- Go to the Section
- Go to the More tab
- Click on Child sections
To reorder one item on your menu
- Click on the cross hairs, for that item, under the Order column
- Drag the item, up or down, to the position you want it to be.
- Click Save changes
To reorder automatically
- Click on the Enable Automatic Ordering toggle switch to put it on
- Choose the order option you want from the dropdown menu
Alphabetical, Last updated or Publish date - If you want to reorder all menu items on your section, check if there is more than one page of items. If there are, click on the Display records dropdown menu and choose All, then click on the select all checkbox at the top of the last column to the right.
- If you only what to automatically order an individual group of items tick the checkbox for each one manually
- Click on Bulk actions
- If you are reordering all the items click on Bulk unlock
- If only reordering a few items click on Bulk Lock top or Bulk Lock bottom depending on where you want the ordered list to appear on your page.
The items will reorder according to your settings.
Note: You do not need to Save changes when you are changing the order of Child sections. Once you reorder menu or content items, if you leave the section without saving or click Cancel the changes remain in place.


